Manage Custom Edge or Chrome bookmark using Intune
In this blog post, we’ll explore how to deploy and oversee Custom Edge Favorites and Google chrome bookmark with Microsoft Intune. For those who don’t know Favorites and Bookmark are same thing. It’s just like Microsoft call it favorites for bookmark.
The policy creates a list of favorites. Each favorite contains the keys “name” and “url,” which hold the favorite’s name and its target. You can configure a subfolder by defining a favorites without an “url” key but with an additional “children” key that contains a list of favorites as defined above (some of which may be folders again). Microsoft Edge amends incomplete URLs as if they were submitted via the Address Bar, for example “microsoft.com” becomes “https://microsoft.com/".
These favorites are placed in a folder that can’t be modified by the user (but the user can choose to hide it from the favorites bar). By default the folder name is “Managed favorites” but you can change it by adding to the list of favorites a dictionary containing the key “toplevel_name” with the desired folder name as the value.
Steps:
Step 1: Generate a text file containing your personalized bookmarks.
Create favorites in the following format. You can customize it as per your requirements to include Intranet Pages or Internal Web Portal URLs. Please ensure the URL and name are in quotes. You can simply copy the below text and modify it as per your requirement.
Note: Change the toplevel_name value to change the Root Level Folder Name that will contain all the favorites.*
[ { “toplevel_name”: “My managed favorites folder” },
{ “url”: “microsoft.com”, “name”: “Microsoft” },
{ “url”: “bing.com”, “name”: “Bing” },
{
“name”: “Microsoft Edge links”, “children”: [
{ “url”: “www.microsoftedgeinsider.com”, “name”: “Microsoft Edge Insiders” },
{ “url”: “www.microsoft.com/windows/microsoft-edge”, “name”: “Microsoft Edge” }
] } ]
Step 2: Create Custom Favorites for Edge on Intune
- Sign in to the Intune admin center
- Click on Devices > Configuration Profiles > Create Profile.
- Platform: Windows 10 and later
- Profile type: Templates > Administrative Templates.
- Click on Create.
- Click on Computer Configuration on the left-hand side.
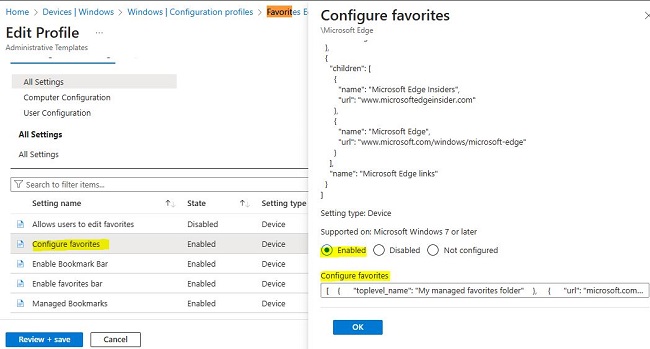
- Select Configure Favorites > Select Enabled.
- Copy and Paste the Bookmarks Text File we created in Step 1 in to the Configure favorites text box.
Step 3:Create Custom bookmark for Chrome on Intune
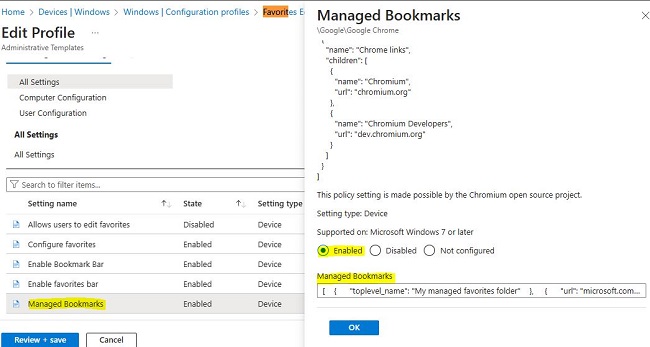
In same configuration, you can add add bookmark for Google Chrome like below:
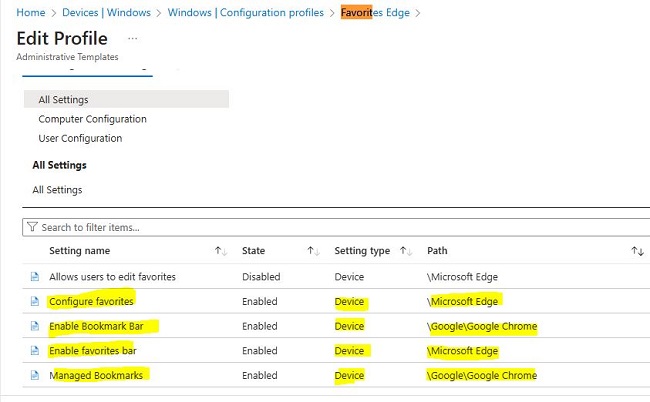
Final customizations would look similar to below:
Step 4: Assignment
Assign this profile to an Entra security group containing users or devices. If you add users to the group, then the profile will get applied even if a user changes their device. But if you want to apply this profile to specific devices only then target this profile to an Entra security group containing devices only.
Step 5: Sync Intune Policy
The device check-in process might not begin immediately. If you’re testing this policy on a test device, you can Sync enrolled device for Windows | Microsoft Learn either from the device itself or remotely through the Intune console.
Alternatively, you can use PowerShell to force the Intune sync on Windows devices. Another way to trigger the Intune device check-in process is by restarting the device.


